


The Class of 1979 Digital Memorabilia Collection now includes over 2,100 digitized photographs and memorabilia items from our years at Sacred Heart Academy in Mount Pleasant, Michigan. It has several purposes:
|
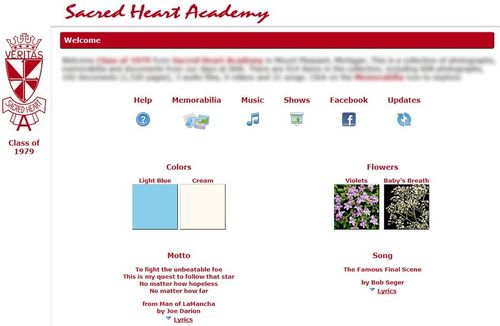
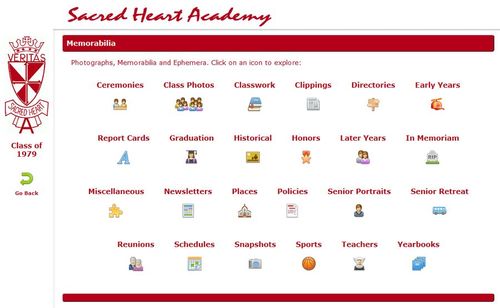
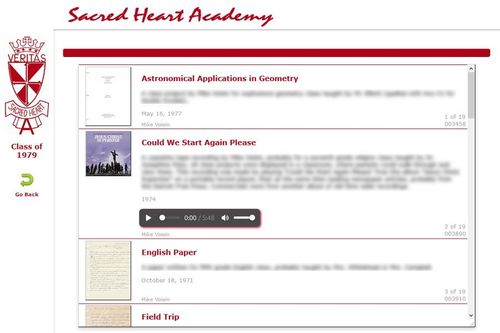
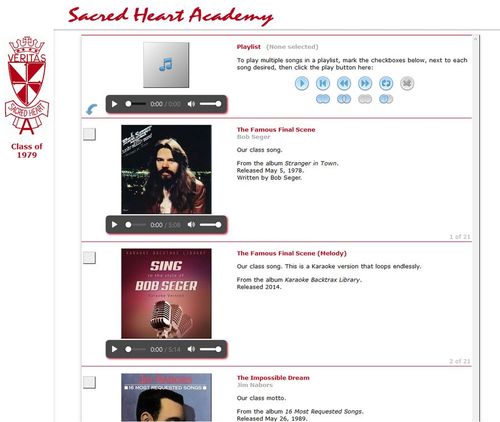
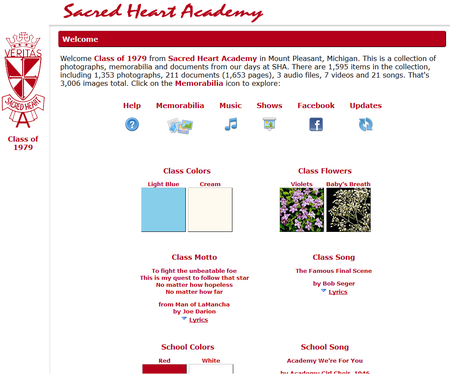
Click for Sample Screens |
|
How to Access the Collection
You can browse through pictures and read memorabilia at your leisure, in the comfort of your home. The collection is provided on a USB thumb drive, suitable for use on a desktop or laptop computer.
- Insert the thumb drive into a USB port on your computer.
- Open your computer's file browser and navigate to the SHA79 thumb drive folder.
- Locate the file named index.html and double-click on it.
- If prompted, choose to open the file using your Internet browser.
This should open your Internet browser and you should see the Welcome page.
 More Detailed Instructions
 Hide
Hide
Extend the USB drive's plug by sliding the little knob on top.
Then insert it into a USB port on your computer.
If a prompt appears, click on it before it disappears.
If there's no prompt, or you miss it, open your computer's file browser.
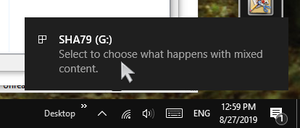
If you clicked the prompt, you'll see the message below.
Scroll down and click on "Open folder to view files."
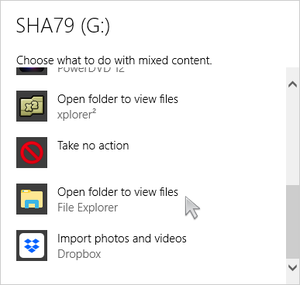
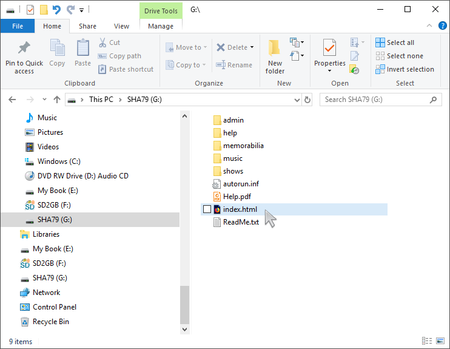
Under the USB drive folder, SHA79, double-click on the file index.html.
If prompted, choose to use, or to continue to use, your Internet web browser to view this file.
Your Internet browser should open and you should see the Welcome page:
If the above steps don't work, open your Internet browser program and type the following into the address box.
Here D: is the drive letter of the USB thumb drive.
file:///D:/index.html
Although it appears like a website on the Internet, it is actually a web page located on the thumb drive itself. You should use the latest version of an Internet browser, like Microsoft Edge, Mozilla Firefox, Google Chrome, or Apple Safari. If you have virus protection software installed, you may need to give permission to allow these local web pages to display.
Additional help is provided in the user guide. See Help.pdf, located on the thumb drive.
Memory Card
If you don't have a computer or a laptop, I have a limited number of micro-SD memory cards. The micro-SD option is problematic however. Many smartphones and tablets restrict access to them. You can test your device for compatability:
Test Your Device
Hide
Insert your own micro-SD card into your tablet or smartphone.
Right-click or long-press on this link: test.html
Choose to download or save test.html to a folder on your external micro-SD card. Don't place it in a folder under your device's internal memory, or internal SD card. You may need to copy the file to your external micro-SD card after you download it.
Use your file explorer app and attempt to open test.html. How you do this depends on your device. In general, long-press on the file and select what to do with it, such as Open With... or Share With..., and choose your Internet browser app.
If you don't see test.html, but you do see test.mhtml, they are not the same.
If you can open this file in your Internet browser app, then your device supports local web pages on an external micro-SD card. You can request a copy of the Digial Memorabilia Collection on a micro-SD memory card, but only if you do not have a desktop computer or a laptop.
If you don't see an option to open this file with your Internet browser app, or you see test.mhtml rather than test.html, then you won't be able to browse the Digital Memorabilia Collection on your smartphone or tablet.
Although the collection itself is free, I charge $5 to cover my costs for the USB thumb drive, and $6 for a micro-SD card.
Please pay via PayPal using the Pay Now button below. You don't need a PayPal account if you pay with a credit card. Before clicking Pay Now, choose an option in the drop-down list:
- Choose Pay for a... if you already received one from me in person.
- Choose Send me a... if you want me to send you one via postal mail. (Specify your mailing address at PayPal.)
|
Sandisk Ultra 16GB 3.0 |
Please verify your computer or laptop can accept a USB thumb drive. Note: If you want a micro-SD card (not common), please e-mail me to discuss it first.
Free alternatives: If you want additional copies, please buy your own USB drive and make a copy of the original. You can also make a copy of your friend's USB drive if they already have one. Or, you can send me a blank 4GB USB drive and a self-addressed stamped envelope (SASE), and I'll make you a free copy.
As of August 2019, thumb drive prices continue to increase due to tariffs. Once my current stock runs out, future orders will likely be $6 or $7.
If you have questions or comments, contact Mike Voisin.
Updates are free. Each update contains just the new or changed files, which you can copy to the thumb drive you already have. Whenever I get enough new material, I will make an update available and announce it on our Facebook group page.
Updates are password-protected. Therefore you must access this page by clicking the Updates icon on the Welcome page from your USB thumb drive.
To do this, open the collection as you would normally, on the USB thumb drive
you already have. Then click the Updates
 icon.
The password is automatically included when you click .
(You must have an active Internet connection.)
icon.
The password is automatically included when you click .
(You must have an active Internet connection.)
If you have photographs or memorabilia, please contribute to this collection so others can enjoy them too. Contact Mike Voisin for details.
Scanner
Here are some recommended settings and tips if you have a scanner:
Scanner Tips
Hide
Choose the option for True Color mode.
Scan at original document size (100%). Please do not enlarge or reduce the image.
Choose a scan resolution of 300 dpi for photographs, and 150 dpi for paper documents.
Use a descreen filter if you are scanning a magazine or newspaper. This eliminates the interference pattern you might see on your scanned images. Magazine descreening is typically 133 lines per inch (lpi) while newspaper descreening is 85 lpi.
Scan to create a JPEG (.JPG) image file. If you can, set the JPEG quality level to 80% (better).
Scan all pages of the document. Include blank pages, and even the inside cover pages, and the back cover. Pages can then be combined correctly into a PDF document and facing pages will continue to face each other, as in the original document.
Try to keep the pages of the document straight and aligned consistently while scanning. This avoids having to rotate each skewed image.
If a page does not fit completely on your scanner, scan it in portions. I will either stitch the portions together to make a single page, or create several pages in place of the single large page.
Digital Camera
If you have a digital camera, you can use it to take digital images of your prints. It works well if the item is a newspaper or something larger than your scanner bed. Here are some recommended settings and tips if you use a digital camera. These tips may also apply if you use a smartphone.
Photo Tips
Hide
Use a tripod if you have one. It minimizes camera movement that may blur words on the page. You can also align the camera directly over the item to photograph. If you hold it by hand, you may skew the camera left-right, up-down, or backward-forward. That may cause some words to be in focus, but others to be out of focus.
Use a shutter delay if available on your camera. Many digital cameras have a setting to add a 2- to 4-second delay after you press the shutter button and before the picture is actually taken. If you have a digital SLR camera, you can also use a cable release to trip the shutter. Both methods minimize camera movement caused by pressing the shutter button.
Use natural ambient daylight to illuminate the item. For instance, place the item on a table in front of a window out of direct sunlight. If you have mini-blinds, close them slightly to avoid harsh light, or wait for a cloudy day.
If you must use incandescent or florescent lighting, adjust your camera settings to compensate for artificial lighting. That will eliminate any unnatural color hues in the image.
Set the option for a higher megapixel resolution. Most digital cameras default to a medium resolution for everyday photos. To better capture the printed words on a page, use a higher resolution. For instance if you have a 10MP camera, set the resolution to 8MP or higher. Note however that a large, super-high resolution image may not result in a clearer picture compared to a lower resolution one. Take a test shot and see if the words on the page are easy to read.
Set the option to disable flash. The flash almost always results in a harsh picture with some areas of the page washed out. You can take good pictures without the flash in low-light conditions if you use a tripod and the 2-second shutter delay feature.
Set the option for macro focus if necessary. If the camera is close to the item you're photographing, the close-focus mode may be better. This may be indicated by a “flower” setting, as if you were taking close-up pictures of flowers.
Photograph all pages of the document. Include blank pages, and even the inside cover pages, and the back cover. Pages can then be combined correctly into a PDF document and facing pages will continue to face each other, as in the original document.
Photograph one page at a time, unless the item is a small book. If each digital image is a single page, it’s easier to process them.
Photograph document pages in consecutive order. This will keep the resulting digital image files in consecutive order and make creating a PDF document easier. For example, IMG_00001.jpg, IMG_00002.jpg, IMG_00003.jpg, and so on.
Try to keep the pages of the document straight and aligned consistently while photographing. This avoids having to rotate each skewed image.
Use a ruler or a chop stick to gently hold the pages of a book flat. Many times the pages of an open book tend to flip unless they’re held down.
Try to keep the camera in the same relative position as you photograph each page. If the camera is closer or further in different shots, it is more difficult to crop the images. A tripod works well.
Contributing Image Files
There are several ways to send me your image files, including FTP, DropBox, Google Drive and e-mail attachments. If you e-mail them, some e-mail servers may reject large image files. You may have to e-mail one or two images at a time. Your e-mail program may also automatically reduce the resolution of your image file attachments, especially if you send them from a smartphone. If you can, upload your images to a desktop computer, compose an e-mail, and attach the image files directly.
An excellent program to view and organize image files is XnView, available for free at www.xnview.com.
If you have ideas for new features or additional content, please let me know. Here are some things I hope to add in the future.
- A good full-color scan of everyone's senior class portrait.
- A family portrait gallery showing your spouse and children, and grandchildren.
- An autobiography section, where everyone describes what they've done since graduation.
Contact: Mike Voisin.
![]()